Wow it’s already 1/2 way through the month of January! My New Year started off with plumbing issues (1/3/2020) – That’s always fun! BUT I know it could be worse!
Wanted to share this new project with you all! Ending 2019 with all kinds of ribbing projects, I thought I would start with yet another one. It’s kind of a continuation from last year as this was shared in our FB Group! I’m almost done with the video so I’ll update this post when it’s finished. But thought I’d go ahead and share the pattern here! This is super easy to make and beginner friendly. Another plus! The Ribbed Ear warmer w/Headband is what it’s called.
Again not my pattern just one that was shared by a few ladies in the group. I just LOVE it! AS many others do as well. They match the Fingerless gloves that I made as well. Post for that one is here – http://yvonnemetz.com/2019/11/27/ribbed-finger-less-gloves/
I’ll update this post when I get the video up and ready! I’ve a few more things going and ready to share. My mind has been going a mile a minute with Designs.
As always thank you for stopping by and……
Happy Crafting!
Yvonne Metz
Vista, CA.
Happy Friday everyone! Hoping your Holidays where spent well! I so enjoyed my time with Family & Friends!
Well before Christmas I shared a few things in our FB Book Group one of them was a New Beanie Pattern I came up with! I KNOW I don’t do patterns and I honestly have NO idea what has gotten into me lately. But this pattern was in my head and finally made it on to my Hook. Super pleased with the results. I’m working on a pattern as I just jotted everything down and will share once it’s done.
Here is the 1st Beanie – Now to come up with a name for it. I thought it looked kinda Grungy and the 1st thing that came to mind was “Nirvana”. So funny as when I mention to the Group about having a hard time coming up with the name, the first comment was this exact thing. Great minds think alike! But then there were a few other names so I’m going to think about them and do a Poll and see which one wins.
Stay tuned as I’ll be sharing more photos AND other things I was working on before Christmas as well. Of course I’ll be making more videos. This one being one of them for sure.
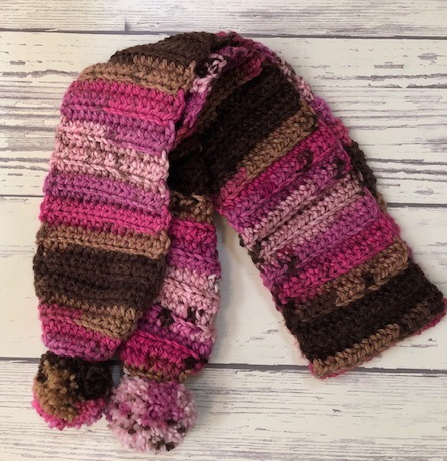
Hey Guys! Well I’m back to share yet another super cute and easy project with you all! Talk about beginner friendly? This Pom Pom Scarf has that written all over it! Perfect project for binge watching your favorite show! I made this one using Loops & Thread Charisma Yarn it’s a Bulky #5 yarn. I used 3 skeins. I know I used 2 full ones for the scarf and needed the other one for the Pom Poms. I know I can squeeze a Twisted Ribbed Headband out of this as well.
As I mentioned above the pattern is Super Easy and Beginner Friendly for sure. Video is posted below as well. Again working in a Ribbing style pattern. I really LOVE how this turned out. I made this one awhile back and am just now getting back into. (Been going through my WIP bag) So below are the things that I used. (Amazon affiliate)
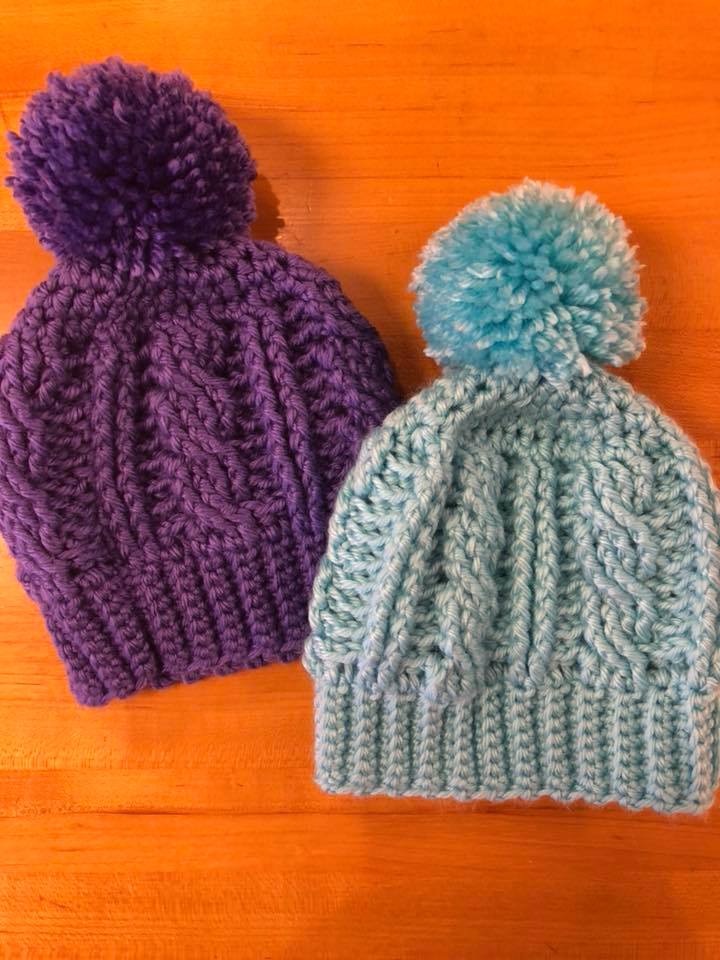
Hey All! Wow it was a rainy day today! It never rains in California! But when it does….it POURS! Does that sound like a song? LOL! So what does one do? Crochet Beanies of course! Here is what I’ve worked on over the last few days. I’m working on a video tutorial for them as well! It’s almost finished. So I’ll post that here as well when its finished.
**Update Video is below
Let me first start by saying that these Beanies are so EASY to work up. PLUS they look good on anyone! LOVE that they are gender neutral.
Also you can use ANY Yarn weight you’d like. From left to right is a #4 weight Yarn Loops & Thread Impeccable, The White in the middle is #5 weight Yarn also Loops & Thread Charisma, and the last is a #6 weight Yarn Lion Brands Thick& Quick!
Now I’ll say the last one works up the quickest! Why? Because you’re using a thick yarn and a large hook. I used a 9/10 MM crochet hook for that one. For the beanie in the middle I used a K hook and the #4 Beanie I used a J Hook. Now you can play around with the all the different yarn weights and hook sizes to see what you like. If you have mostly #4 yarn but want a thicker Beanie? No problem just use 2 strands held together. Super versatile.
Or if I wanted say a Slouchy style Beanie. I’d go up a hook size or 2 so I would get a looser fitting Beanie. For example I would use #4 yarn which is the lightest weight yarn. I used a J hook and got a firm stitch. Not sure how slouchy you can get with a thicker yarn BUT I’m sure it’s doable.
Here is a helpful tool that I found the other day that I’ve been using for years! It’s a Head circumference chart. I feel it’s pretty accurate for all the average size heads. Download HERE – Head circumference guide
Quick tip about this Beanie – It’s worked in Measurements so there is no stitch count. So be sure to download the Guide above for the size you want to make.
So as mentioned above you are working with Measurements so you’ll need to decide what size you want to make. I’ll give you what I did for the Adult sizes in the photo above.
I started with a chain that was 11″ long – this includes the brim to flip over. So for me with #4 yarn & a J hook I got 39 chains – with #5 yarn and K hook I got 37 chains – with #6 yarn & M hook I got 24 chains.
Once you have the amount of chains you need for the side you are making
Row 1: HDC in 3rd chain from hook and in each chain across, ch 1, turn
Row 2 – ??: HDC in BLO of each stitch across ***except in the 1st & last stitch you’ll want to go through BOTH loops. This will give you a nice clean edge when you fold up your brim. Ch1, turn.
Repeat Row 2 til you get the head circumference you need. For the ones I did I went 18-19 inches. This style of ribbing is stretchy. Below are the number of Rows I got for each yarn weight.
#4 Yarn (brand above) – 35 rows **Using Red Heart w/Love I got 41 rows
#5 Yarn – 36 rows
#6 Yarn – 29 rows
Next you’re going to bring both ends together and slip stitch going through both thicknesses. ***This will be your seam and the inside of your hat. When you reach the end FO and leave a long tale for sewing up the top of the Beanie.
With the yarn needle you’ll weave it in and out the top of the Beanie. Pulling tight at the end and making sure it’s completely closed. Turn the hat inside out ADD your Pom Pom if desired and you’re DONE! Now you could add a sc edge around the brim if you’d like. (I show this in the video) But that’s all there is to it!
So I’ll leave you with that for now! Thanks so much for stopping by! If you have any questions please leave me a comment!
Happy Friday All! Wow it’s been a long last few days of video taping. BUT I’m on a mission! If you are in our Crochet Group on Facebook you know the Rib-Twisted Headbands are being made like crazy! I made the Ribbed Finger-less gloves to match as well!
But the other pattern that is super popular is the Cable Hat by Diana! I made a matching Scarf for it. Finally!
So what yarn you see here is Red Heart Soft (Really Red) and Red Heart Super Saver in Dusty Grey. Now the video is done and you’ll see it below. I haven’t decided how I want to finish my Red Scarf yet. Hmmm…..Right now it measures 40″ and I’m wanting it just a bit longer. I’ve used 2 skeins so far and I’m on my 3rd. BUT I also made a matching Cable Hat as well. Both Scarfs I used a J Hook the Grey one is a little wider then the Red one. I explain this in the Video that I made which I’ll share once it’s ready to go. Here is the Pattern for you to enjoy. Again I’m not a pattern writer so if there are any mistakes please let me know. Crochet Cabled Scarf
As far as finishing your scarf. There are a few options you can do. You can add fringe on the bottom, add Tassels, make it an infinity cowl and lastly you can add a Large Pom Pom. If you are adding Fringe you’ll just need to decide how long you want it. Example if you want it 5″ cut your yarn 10″ fold in half and attach to each end of your scarf. I use the Latch Hook Method. You’ll want about 4-5 strands. Below are some of the items that I’m using for this project. (I’m an Amazon Affiliate)
Yay it’s the weekend! Wow what a long and busy week! I was able to get yet another video finished! This one is from a Member of our Crochet Messy Bun Group on Facebook Rebecca Roberts. It’s called the Harvest Hat! It’s a very pretty Beanie with a great look! I was given permission to make a video of it for you all! At end of post. So Sweet! Thank you Rebecca, I know many will enjoy making this gorgeous hat!
Here is the first one I made. Now for the pattern – again I’m not a pattern writer and I used the notes Rebecca gave me.
As I worked the Beanie I made adjustments so I’m hoping you’ll be able to understand.
If you have any questions on the pattern itself don’t hesitate to ask.
Stitch Abbreviations : Ch – Chain SC – Single Crochet HDC – Half Double Crochet YO – Yarn Over Sl st – Slip Stitch
Special stitches used: Single Crochet Decrease (SC Dec) : insert hook in next stitch, bring up a loop, insert hook in next stitch, bring up a loop, pull through all 3 loops on your hook.
Back Post Double Crochet (BPDC): YO, insert hook behind post of stitch (insert hook from back to front of stitch), YO, pull up a loop, YO, (pull through 2 loops) twice.
Front Post Double Crochet (FPDC): YO, insert hook behind post of stitch (insert hook from front to back of stitch), YO, pull up a loop, YO, (pull through 2 loops) twice.
Single Crochet 2 together (sc2tog) :
V Puff Stitch (VPS) : (YO, insert hook in st indicated, YO, Pull up a Loop) x 4, you’ll have 9 loops on your hook, YO and pull through all 9 loops on your hook, ch 1 to close, repeat in the same stitch. *Optional you can ch 1 in between the Puff Stitch
Notes : Pattern is worked in multiples of 8 Ch 2 does NOT count as a stitch unless otherwise noted.
Ribbed Brim : Chain 9
R 1: Sc in 2nd chain from hook and in each chain across, ch1, turn (8 sc)
R 2-72: In back loops only, sc in each st across (8)
**Rows for brim need to be divisible by 8 if possible, if not make sure the 1st row of the Hat part is.
Closing the Brim – Bring both ends together and slip stitch down going through both thicknesses. This is your seam so it will be on the inside of your hat.
Hat Part – If your brim isn’t worked in a number divisible by 8, then your 1st row of the Hat needs to be.
R 1: HDC evenly around the brim, join w/sl st, ch 1 (72)
R 2: (HDC x 2, FPDC x1, HDC x 2, skip st, V Puff Stitch, skip st) Repeat ( ) around, join w/sl st, ch 1
R3 – 6: (HDC x 2, FPDC in previous FPDC, HDC x 2, V Puff stitch in previous VPS), repeat ( ) around, join w/sl st, ch 1
R 7: HDC around, join w/sl st, ch 1 (72) *note you’ll be working in the V Puff Sts – 3 stitches evenly across see photo
Next Section:
R 8: (HDC x 2, V Puff Stitch, HDC x 2, skip st, FPDC x1, skip st), repeat ( )around, join w/sl st, ch 1
***Note make sure your FPDC & V Puff Stitch Flowers line up
R 9-12: (HDC x 2, V Puff Stitch in previous VPS, HDC x 2, FPDC in previous FPDC), repeat ( ) around, join w/sl st, ch 1
R 13: HDC around, join w/sl st, ch 1 (72) *note you’ll be working in the Puff Stitches – you should have 3 stitches
Next Section:
R 14: (HDC x 2, sk st, FPDC, sk st, HDC x 2, V Puff Stitch), repeat ( ) around, join w/sl st, ch 1
***Note make sure your FPDC & V Puff Stitch Flowers line up
R15 –18: (HDC x 2, FPDC in previous FPDC, HDC x 2, V Puff stitch in previous VPS), repeat ( ) around, join w/sl st, ch 1 ***Measure at this point. Mine at R16 measured 8″
Row 19: SC Dec around, join w/sl st, ch 1 Row 20: SC Dec around, join w/sl st (Fasten off here for MBH)
For Full Hat cut a long tail and weave in and out of the top row of hat. Pull tight to close top and Fasten Off and ADD your Pom Pom!
I can’t believe I totally forgot to share this update here! So I mentioned in a few post before that The “Original” Katniss Messy Bun Beanie by Diana Borgstrom is still a favorite in our Messy Bun Group! This was my 1st crochet video I ever did. I ended up re-doing it and showing how to do a Full Beanie and where to stop for the Messy Bun Version. I revised the pattern to add a few things to it. Here is the updated version of the pattern: Full Katniss Beanie
If you find any mistakes or have any questions please ask! This Beanie has such great texture! Super easy to make as well. You can’t make just one!
Thanks for stopping by and as always Happy Craftin’…
Hey Guys, I’ve got another quick and easy project for you all! It’s a great stash buster too! With Halloween right around the corner these are cute easy and fast to make.
There will be a video as well and I’ll update this post as soon as I’m done with it. All the materials I used for these little guys are below. (amazon affiliate)
MC: Magic Circle
SC: Single Crochet
CH: Chain
FO: Finish Off your work
BLO: Back Loop Only
Sts: stitches
sl st: Slip Stitch
sc inc: Single Crochet Increase – add 2 sc sts in the same space
sc dec: Single Crochet Decrease – pick up 2 sts and decrease
Notes: You’ll be working in the Round unless otherwise stated in this project.
Directions: Starting with the White Yarn, Magic Circle
Round 1: 6 sc inside the MC (6)
Round 2: (sc inc, sc x 1) x 3 (9)
Round 3: (sc inc, sc x 2) x 3 (12) Round 4: sc x 12 (12) change color to Orange
Round 5: (sc inc, sc x 3) x 3 (15)
Round 6: (sc inc, sc in x 4) x 3 (18)
Round 7-8: sc x 18 (18 )
Round 9: (sc inc, sc x 5) x 3 (21)
Round 10: (sc inc, sc x 6) x 3 (24) change color to yellow
Round 11-12: sc x 24 (24) Add facial features & Keychain at this point
Round 13: sc BLO x 24 (24)
Round 14: (sc dec, sc x 6) x 3 (21)
Round 15: (sc dec, sc x 5) x 3 (18) Stuff at this point
Round 16: sc dec x 9 (9) FO and leave a long tail for sewing
That’s all there is to it! Hope you enjoyed this super cute & easy Candy corn key chain! If you have any questions please don’t hesitate to ask!
Thanks for stopping by and as always Happy Craftin’,
Yvonne Metz
Vista, CA.
Hey All! I know LONG time no post – I tell you so much has been going on since my Granddaughter “Alana Elise” has been born! Being at my Daughters and helping her (C-Section) and working, Hooking and trying to make Videos?? I just need to slow it down! LOL! I have made a few new videos and am making more! I wanted to share these 2 Hats I made for my Granddaughter with the Adult Cable Pattern!
I’ll post a photo with her wearing it! She doesn’t seem to be a fan of having things on her head! LOL! Anyway, here is the Pattern by Diana Borgstrom for the ADULT Version M@ssy Bun Cable Hat
UPDATED to ADD the BABY Cable – Baby Cable Hat
Now there are a few things that I’ll do different next time for the Baby Size – 1 is to make the brim smaller – I’ll do Ch 6 instead of the one that is in the Adult version although you can fold it up if you’d like. There will be a video made for this size coming very soon.
One more thing I did 50 rows for the brim and that fit her perfect. Remember this pattern is worked by measurements – so measure the head that the beanie is for. I just LOVE how tiny and cute this is and LOVE how this fits on my Granddaughter!
I have more to share and will do so very soon! I just now seen some messages and I apologize for not getting back to you sooner. I’m usually notified when I get comments and I wasn’t. UGH! Anyway enjoy the pattern. Need to see the Video? You can see it HERE!
 This is super easy to make and beginner friendly. Another plus! The Ribbed Ear warmer w/Headband is what it’s called.