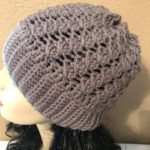
Yay it’s the weekend! Wow what a long and busy week! I was able to get yet another video finished! This one is from a Member of our Crochet Messy Bun Group on Facebook Rebecca Roberts. It’s called the Harvest Hat! It’s a very pretty Beanie with a great look! I was given permission to make a video of it for you all! At end of post. So Sweet! Thank you Rebecca, I know many will enjoy making this gorgeous hat!
 Here is the first one I made. Now for the pattern – again I’m not a pattern writer and I used the notes Rebecca gave me.
As I worked the Beanie I made adjustments so I’m hoping you’ll be able to understand.
If you have any questions on the pattern itself don’t hesitate to ask.
Materials I used below: (amazon affiliate)
Yarn: “I Love this Yarn” Hobby Lobby in Pinkytoes #4
Hook Clover Amour H/5.0mm – https://amzn.to/3697oAe
Clover Amour Set – https://amzn.to/307BmWl (Best Deal)
Yarn Needles – https://amzn.to/2O905lw
Directions:
Stitch Abbreviations :
Ch – Chain
SC – Single Crochet
HDC – Half Double Crochet
YO – Yarn Over
Sl st – Slip Stitch
Special stitches used:
Single Crochet Decrease (SC Dec) : insert hook in next stitch, bring up a loop, insert hook in next stitch, bring up a loop, pull through all 3 loops on your hook.
Back Post Double Crochet (BPDC): YO, insert hook behind post of stitch (insert hook from back to front of stitch), YO, pull up a loop, YO, (pull through 2 loops) twice.
Front Post Double Crochet (FPDC): YO, insert hook behind post of stitch (insert hook from front to back of stitch), YO, pull up a loop, YO, (pull through 2 loops) twice.
Single Crochet 2 together (sc2tog) :
V Puff Stitch (VPS) : (YO, insert hook in st indicated, YO, Pull up a Loop) x 4, you’ll have 9 loops on your hook, YO and pull through all 9 loops on your hook, ch 1 to close, repeat in the same stitch. *Optional you can ch 1 in between the Puff Stitch
Notes :
Pattern is worked in multiples of 8
Ch 2 does NOT count as a stitch unless otherwise noted.
Ribbed Brim : Chain 9
R 1: Sc in 2nd chain from hook and in each chain across, ch1, turn (8 sc)
R 2-72: In back loops only, sc in each st across (8)
**Rows for brim need to be divisible by 8 if possible, if not make sure the 1st row of the Hat part is.
Closing the Brim – Bring both ends together and slip stitch down going through both thicknesses. This is your seam so it will be on the inside of your hat.
Hat Part – If your brim isn’t worked in a number divisible by 8, then your 1st row of the Hat needs to be.
R 1: HDC evenly around the brim, join w/sl st, ch 1 (72)
R 2: (HDC x 2, FPDC x1, HDC x 2, skip st, V Puff Stitch, skip st) Repeat ( ) around, join w/sl st, ch 1
R3 – 6: (HDC x 2, FPDC in previous FPDC, HDC x 2, V Puff stitch in previous VPS), repeat ( ) around, join w/sl st, ch 1
R 7: HDC around, join w/sl st, ch 1 (72)
*note you’ll be working in the V Puff Sts – 3 stitches evenly across see photo
Next Section:
R 8: (HDC x 2, V Puff Stitch, HDC x 2, skip st, FPDC x1, skip st),
repeat ( )around, join w/sl st, ch 1
***Note make sure your FPDC & V Puff Stitch Flowers line up
R 9-12: (HDC x 2, V Puff Stitch in previous VPS, HDC x 2, FPDC in previous FPDC), repeat ( ) around, join w/sl st, ch 1
R 13: HDC around, join w/sl st, ch 1 (72)
*note you’ll be working in the Puff Stitches – you should have 3 stitches
Next Section:
R 14: (HDC x 2, sk st, FPDC, sk st, HDC x 2, V Puff Stitch),
repeat ( ) around, join w/sl st, ch 1
***Note make sure your FPDC & V Puff Stitch Flowers line up
R15 –18: (HDC x 2, FPDC in previous FPDC, HDC x 2, V Puff stitch in previous VPS),
repeat ( ) around, join w/sl st, ch 1
***Measure at this point. Mine at R16 measured 8″
Row 19: SC Dec around, join w/sl st, ch 1
Row 20: SC Dec around, join w/sl st (Fasten off here for MBH)
For Full Hat cut a long tail and weave in and out of the top row of hat. Pull tight to close top and Fasten Off and ADD your Pom Pom!
Thank you so much for stopping until next time….
Happy Craftin’,
Yvonne Metz
Vista, Ca.


