Tag: Clover Amour Hooks

Crochet Cable Scarf

Happy Friday All! Wow it’s been a long last few days of video taping. BUT I’m on a mission! If you are in our Crochet Group on Facebook you know the Rib-Twisted Headbands are being made like crazy!  I made the Ribbed Finger-less gloves to match as well!

But the other pattern that is super popular is the Cable Hat by Diana! I made a matching Scarf for it.  Finally!

So what yarn you see here is Red Heart Soft (Really Red) and Red Heart Super Saver in Dusty Grey.  Now the video is done and you’ll see it below.  I haven’t decided how I want to finish my Red Scarf yet. Hmmm…..Right now it measures 40″ and I’m wanting it just a bit longer.   I’ve used 2 skeins so far and I’m on my 3rd. BUT I also made a matching Cable Hat as well.  Both Scarfs I used a J Hook the Grey one is a little wider then the Red one.  I explain this in the Video that I made which I’ll share once it’s ready to go.  Here is the Pattern for you to enjoy.  Again I’m not a pattern writer so if there are any mistakes please let me know.  Crochet Cabled Scarf

As far as finishing your scarf.  There are a few options you can do.  You can  add fringe on the bottom, add Tassels, make it an infinity cowl and lastly  you can add a Large Pom Pom.  If you are adding Fringe you’ll just need to decide how long you want it.  Example if you want it 5″ cut your yarn 10″ fold in half and attach to each end of your scarf. I use the Latch Hook Method.  You’ll want about 4-5 strands.  Below are some of the items that I’m using for this project. (I’m an Amazon Affiliate)

I used the following materials.
Yarn: Red Heart Soft – Really Red – https://amzn.to/2L9aMm5
Hook Clover Amour J/6.0mm – https://amzn.to/35ttRa3
Clover Amour Set – https://amzn.to/307BmWl
Large Pom Pom Maker – https://amzn.to/2DvZ40y

Well that’s it for now! Thank you for stopping by!
Until next time Happy Crafting,
Yvonne Metz
Vista, CA.
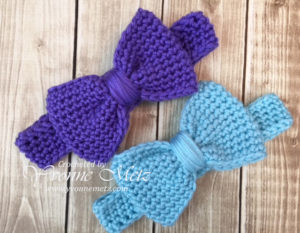
Crocheted Baby Bow Headband

Well looks like everything is back in order!  So here’s my newest video and project! My Daughter is Pregnant with my 2nd Grand-baby and it’s a GIRL! My Co-Worker is also PG and having a Girl. Their Due Dates are a day apart! July 3rd & 4th! So what do I do?  Well Baby Bow Headbands of course!  Many more colors in the making!

Super easy to make and if you’re following my on YouTube then you’ve seen the video. If you aren’t a subscriber yet click on the link in the right hand corner and it’ll take you to my YouTube Channel. I’m also posting the Video below.

I’m thinking you’d like the directions for this? Well I think I can help with that! These are so easy to make you won’t be able to make just one!  Also FYI this project is done by measuring so you can do any size you’d like.

Materials: (affiliate links)

Yarn:  Red Heart Soft Baby Steps #4
Hook:  Clover Amour I 5.5mm hook – http://amzn.to/2pw9cyQ
project is done by measurements so you can use any size hook
Accessories: Scissors, Yarn Needle, Tape Measure (Stitch/Row Counter- optional)

Abbreviations:
Ch:  Chain
Sc:  Single Crochet
FSC: Foundation Single Crochet
Slst:  Slip stitch

Headband

R1:  50 FSC – (or however many you need to get the size you want) Don’t want to do a FSC? You can chain til you get the size you need then go to R2. *Bring both ends together and join w/slst, ch 1
R2-5:  sc in each stitch around, join w/slst, ch 1 (50)  Add more rows if you want it wider.  For the Baby size mine measured 1 ¼”

Finish off after last round and Weave in ends

Bow –  *If you want a Longer Bow add more chains if you want a Wider Bow add more Rows.

Ch 36 – I worked in the back bumps of the chains to give it a nice finish on the bottom.
R1: sc in each back bump of chain across – join to the 1st sc – being careful not to twist. ch 1 (36)
R2 – 12 – sc in each stitch around, join w/sl st, ch 1 (36) Mine measured 2 ¾” this was perfect for Baby Size.

Bring rows of the Bow together – making sure that where you finished off is in the middle – With the yarn threaded run it down the middle of the bow to the bottom and pull tight to scrunch it up. Then Wrap yarn around til it’s as thick as you’d like it. Attach to Bow to the Headband.

You can sell what you make from this pattern just not the pattern itself as it’s FREE! Mentions are awesome and appreciated! Enjoy!

That’s it! As always thanks for stopping by and as always…..
Happy Craftin’,
Yvonne Metz
Vista, CA.

What Hooks do I use?

Hey All! I wanted to share a question that I get asked a lot.  “What Crochet Hooks do I use?”  Well I use many of them Boye Brand was what I started out with many years ago along with Susan Bates. But I have found a New Brand “Clover”.  I was looking for something with a little more comfort as I do crochet A LOT!  I tried Clover Soft Touch it was comfy BUT I fell in LOVE with Clover “Amour” – These are my all time FAVORITE Hooks!  If you watch my videos I use them ALL the time! I love the soft grip and I do crochet much longer with them. I have one more set to collect but I’ve got just about ALL of them!  Below I’m adding the ones that I do have (Amazon Affiliate)

If you are looking for something new and crochet a lot TRY them – I tried the “J” Hook first then ordered my set!   You won’t be disappointed!  I’ve got more goodies to share with you all a little later as things have slowed down here. I plan on Blogging more and doing more videos in 2018!

As always thanks for stopping by and Happy Crafting!
Yvonne Metz

Time to get your Jolly on….

How adorable are these Santa Hats?  Super FUN and Perfect for the Holidays!  That’s right it’s that time to get your Jolly on!

This pattern was shared on a Facebook Group by Sarah Zimmerman from Repeat Crafter Me.  You can find the pattern HERE.

UPDATED:

I used the Hooks below  – (Amazon Affiliate Link)
Hook: Clover Amour Size L/8mm – https://amzn.to/336K9EO
Hook: Clover Amour Size M/9mm – https://amzn.to/31Ml1lD

I did modify it to fit a Teen/Adult hat. Here is what I did –

With the L Hook I started with a chain of 44 and that measured 20″ –
I switched to M Hook when it changes to Red. After round 3. Then after 4th round it says to Repeat it 4 more times – I ended up doing 8 more times for Adult size. Giving me a total of 12 rows –
Then when we get to the Shape top: This is what I did (You’ll see in the pattern is says next rnd: I changed it up)
R1 – ch1 *(Sc2tog), sc in next 20, repeat* once, join, ch 1 (42)
R2-3 – sc in each around, join, ch 1 – (42)
R4 – (sc in next 5, sc2tog), repeat () around, join, ch1 (36)
R5-6 – sc in each around, join, ch 1 – (36)
R7 – (sc in next 4, sc2tog), repeat () around, join, ch1 (30)
R8-9 – sc in each around, join, ch 1 – (30)
R10 – (sc in next 4, sc2tog), repeat () around, join, ch1 (25)
R11-12 – sc in each around, join, ch 1 – (25)
R13 – (sc in next 4, sc2tog), repeat () around, join, ch1 (20)
R14-15 – sc in each around, join, ch 1 – (20)
R16 – (sc in next 4, sc2tog), repeat () around, join, ch1 (16)
R17-18 – sc in each around, join, ch 1 – (16)
R19 – (sc in next 4, sc2tog), repeat () around, join, ch1 (12)
R20-21 – sc in each around, join, ch 1 – (12)
R22 –  (sc in next 4, sc2tog), repeat () around, join, ch1 (10)
R 23-32 – sc in each around (10) From here you’ll follow the pattern Even though you’ll have 20 stitches instead of 16. It will still work out fine!
Should you have any questions please let me know – If you are not a crocheter and would like to order a Santa Hat click on the Etsy link in the top right hand corner.  OR message me and I can send you a Paypal Invoice.

Thanks for stopping by and as always,

Happy Craftin’,
Yvonne Metz
Vista, Ca.

error: Content is protected !!
0
0

Your Cart