Happy Fall everyone! I know it’s been way to long since my last post. Lots going on for sure. I’ll share when I’m able to. I just finished a long awaited video. Way to long, but here we go! I made the Nirvana Beanie a few years ago and the pattern starts with the brim. Many in our Facebook Group wanted the Top Down version and I figured it out. For those that are visual learners I’ve finally finished the video. Which I’ll be posting today. The link will be here as well.
So without further ado…….The Nirvana Beanie (Top-down Version)
I’ve been in LOVE with how this beanie turned out when I created it a few years back. I love the texture. The photo shows the Slouchy version. I used Red Heart with Love yarn.
In the video I’m using “I Love this Yarn” and I made a fitted version. You can get 2 beanies out of 1 skein of yarn. I have yet to make a slouchy version out of this brand of yarn but I plan on it.
I’ll share pictures of the other beanies I’ve made on another post. I’ve only made about 10 or 11. Yes, been busy hooking!
Here is the Pattern: TOP DOWN NIRVANA BEANIE Pattern directions are for Slouchy style, video is fitted.
Here is the video to make this Beanie:
Left-handed Top down Nirvana video
I hope you enjoy making this beanie as I have. If you have any questions please don’t hesitate to ask. I’ve got more projects coming your way. I’m actually obsessed with making Hexagon Cardigans right now as well. They are so fun to make, addicting and so many color choices!
I know it’s been way to long since I posted! Like everyone else there’s just been so much going on. Boy have I missed sharing things here! Wanted to share that I’m getting back into the swing of things. From blogging and making more video tutorials! YES, you read that right!
I thought I’d start off with something that has been keeping my super busy lately! What is it you ask? Well, it’s bee’s…yup LOT’s of BEE’s!! They are selling like crazy and I can’t keep up! I did a video which I’ll share once it’s loaded on YouTube! I have to warn you though I’m a little out of practice. LOL!! Below are just a few I’ve made.
My inspiration came from TikTok – I first saw the pattern by Robin of Hooked by Robin on YouTube. Then I saw the Kaytedid’s one as well on TikTok. I played around and came up with different sizes that I wanted to share with you all!
Aren’t these the cutest??? This is the most popular size that I make. I do a Mini, Small and Medium which I’ll share with you below. YouTube video is now ready.
I hope you enjoy making them as much as I have. If you have any questions please don’t hesitate to ask.
Materials used Yarn – Bernat Baby Blanket 6 ply Yellow, White, Black (small amount of #4 black yarn) Hooks: Clover Amour K/6.50mm – https://amzn.to/2F4kcvt Clover Amour Size L/8mm – https://amzn.to/336K9EO Poly-Fil
Accessories: Safety eyes 9 or 10 mm, Tapestry needle or Crochet eyes
Abbreviations: MC – Magic Circle SC – Single Crochet HDC – Half Double Crochet INC – Increase stitches (2 in same stitch) DEC – Decrease stitches (work 2 stitches together) SLST – Slip Stitch ST(S) – Stitch/Stitches
Mini Bee
Instructions:
Start with a Magic Circle (mc)
Rnd 1: 6sc in mc, join, ch 1 (6) Rnd 2: (sc inc) in each, join, ch 1 (12) Rnd 3: (sc, sc inc) around, join, ch 1 (18) Rnd 4: sc in each st around, join, ch 1 (18) change to black Rnd 5: sc in each st around, join, ch 1 (18) change to yellow (Insert Eyes between rnds 3/4) Rnd 6: sc in each st around, join, ch 1 (18) change to black Rnd 7: sc in each st around, join, ch 1 (18) change to yellow Rnd 8: sc in each st around, join, ch 1 (18) change to black Rnd 9: sc in each st around, join, ch 1 (18) change to yellow Rnd10-11: sc in each st around, join, ch 1 (18) STUFF your Bee Rnd 12: (sc, sc dec) around, join, ch 1 (12) continue to stuff lightly Rnd 13: Dec around, join, ch 1 (5) finish off – Stuff more if needed and weave in yarn ends.
Crochet eyes: F hook & worsted yarn. Magic circle, 5 sc finish off. If too small add sc or use bigger hook
Attach to the Bee’s back – I placed mine in the middle of the bee’s back.
Small Bee
Instructions:
Start with a Magic Circle (mc)
Rnd 1: 6sc in mc, join, ch 1 (6) Rnd 2: (sc inc) in each, join, ch 1 (12) Rnd 3: (sc, sc inc) around, join, ch 1 (18) Rnd 4: (sc x 2, sc inc) around, join, ch 1 (24) Rnd 5: sc in each st around, join, ch 1 (24) change to black (Insert Eyes at Rnds 4/5) Rnd 6: sc in each st around, join, ch 1 (24) change to yellow Rnd 7: sc in each st around, join, ch 1 (24) change to black Rnd 8: sc in each st around, join, ch 1 (24) change to yellow Rnd 9: sc in each st around, join, ch 1 (24) change to black Rnd 10: sc in each st around, join, ch 1 (24) change to yellow Rnd 11: sc in each st around, join, ch 1 (24) Rnd 12: (sc x 2, sc dec) around, join, ch 1 (18) STUFF your Bee Rnd 13: (sc, sc dec) around, join, ch 1 (12) continue to stuff lightly Rnd 14: Dec around, join, ch 1 (6) finish off – Stuff more if needed and weave in yarn ends.
Attach to the Bee’s back – I placed mine in the middle of the bee’s back.
Medium Bee
Instructions:
Start with a Magic Circle (mc)
Rnd 1: 6sc in mc, join, ch 1 (6) Rnd 2: (sc inc) in each, join, ch 1 (12) Rnd 3: (sc, sc inc) around, join, ch 1 (18) Rnd 4: (sc x 2, sc inc) around, join, ch 1 (24) Rnd 5: (sc x 3, sc inc) around, join, ch 1 (30) Rnd 6: sc in each st around, join, ch 1 (30) change to black (Insert Eyes between Rnds 4/5) Rnd 7: sc in each st around, join, ch 1 (30) change to yellow Rnd 8: sc in each st around, join, ch 1 (30) change to black Rnd 9: sc in each st around, join, ch 1 (30) change to yellow Rnd 10: sc in each st around, join, ch 1 (30) change to black Rnd 11: sc in each st around, join, ch 1 (30) change to yellow Rnd 12: sc in each st around, join, ch 1 (30) Rnd 13: (sc x 3, sc dec) around, join, ch 1 (24) Rnd 14: (sc x 2, sc dec) around, join, ch 1 (18) STUFF your Bee Rnd 15: (sc, sc dec) around, join, ch 1 (12) continue to stuff lightly Rnd 16: Dec around, join, ch 1 (6) finish off – Stuff more if needed and weave in yarn ends.
Hey All! Well I’m back with another great tutorial. This one I’ve posted before BUT I’ve update the pattern. When the Mermaid Tail Blanket Craze hit about 4 yrs ago I created a size for an 18″ Doll (using my friends daughter’s American Girl Doll). I was inspired by so many out there – MJ’S Off the Hook Designs & many others.
Here’s the one I made recently. I just love this color.
I’ve decided to make a video tutorial on how I made it as well. I know there are many visual learners. I’ll update this post with the videos once it’s loaded on YouTube.
As always I make the videos available for Left-handed crocheters as well.
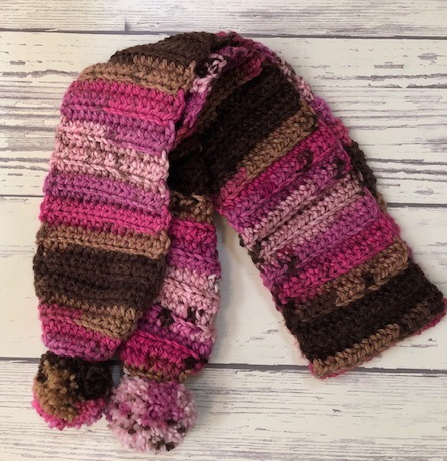
Hey Guys! Well I’m back to share yet another super cute and easy project with you all! Talk about beginner friendly? This Pom Pom Scarf has that written all over it! Perfect project for binge watching your favorite show! I made this one using Loops & Thread Charisma Yarn it’s a Bulky #5 yarn. I used 3 skeins. I know I used 2 full ones for the scarf and needed the other one for the Pom Poms. I know I can squeeze a Twisted Ribbed Headband out of this as well.
As I mentioned above the pattern is Super Easy and Beginner Friendly for sure. Video is posted below as well. Again working in a Ribbing style pattern. I really LOVE how this turned out. I made this one awhile back and am just now getting back into. (Been going through my WIP bag) So below are the things that I used. (Amazon affiliate)
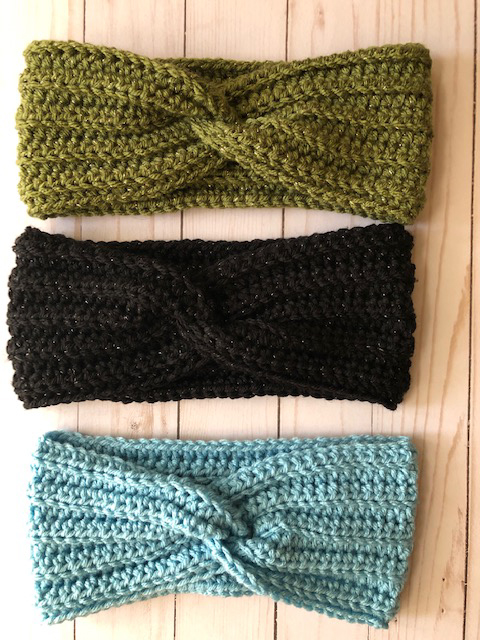
Happy Friday All! Well I’ve got another great beginner friendly, fun and EASY project! Need a stash buster project? This is the one for you!
These Headbands with a Twist have been going around like crazy in our Crochet FB Group. So fast and easy to make. These directions were shared by a Member in our group, THANK YOU Tracy Gibson!! So super easy to follow.
I’ve also made a video for those that are visual learners. You’ll see it below. Now on to the directions!
CH – Chain
HDC – Half Double Crochet
BLO – Back Loop Only
This Easy and Gorgeous Adult size Headband can be done with ANY Yarn. You are basically going by measurements. Which means you can make any size you’d like.
Gauge: Really not necessary BUT this is what I got
15 HDC = Approx 4 ¼”
10 Rows = 4 ¼ “
Pattern:
Ch 70 or size you need for your head. This measured about 18 ½” my head measures 21” This will stretch so it was perfect.
Row 1: working in the bump, HDC in 3rd ch from hook and in each across, ch 1, turn (68)
Row 2: working in BLO, HDC x 68, ch1, turn (68)
Row 3-10: Repeat Row 2, ch 1 (Mine measured at 4 ¼ at this point. If you’d like it longer then keep going.
That’s all there is to this headband hope you enjoyed – Please do not sell this pattern as your own. It was shared freely. You may sell what you make with it. The PDF is in our FB Group – https://www.facebook.com/groups/603800456472001/
Enjoy & Happy Headband Makin’ – The Video is Below! If you have any questions please ask! Thanks for stopping by! Yvonne