Tag: beginner crochet project

Crochet Chunky Cowl Tutorial & Video

Well it’s the last day of 2019!  Wow this year has just flown by! I wanted to post this project which I made TONS of before Christmas and just hadn’t had the time to post them.  So I’ve also made a short video showing how to make these beginner friendly cowls! They take about an hour to make and also make great gifts.
Here’s the 1st 3 that I made! All using Lion Brands Thick & Quick! Talk about Quick!  They truly are! These were shared in our FaceBook Group by Emily H at the end of 2018 and they resurfaced again this year and were a BIG hit again!  Now for these I used 1 skein and some of another one. BUT you an use 1 skein just do about 7 rows instead of 10. You’ll still have a nice warm cowl around your neck.  Here is how easy they are to work up and some of the materials I used.

Materials: (amazon affiliate)

Yarn:
Lion Brand Thick & Quick Fisherman – https://amzn.to/2SIYUfg
Lion Brand Thick & Quick Oxford Grey –  https://amzn.to/2FbE4Nk

Hooks:
Clover Amour N/P 10.0 mm – https://amzn.to/2sD5x7V
Clover Amour Set Thicker yarn Hook Set:  https://amzn.to/2EuSuI8

Yarn Needles – https://amzn.to/2O905lw
Toggle Wood Buttons: https://amzn.to/2PDAb9S
Stitch Markers – https://amzn.to/2NfbHn

Directions:  This ended up for to be 10″ x 32″
Start with a ch of 62 or you an do a Foundation Double Crochet
Row 1:  DC in 3rd chain from hook (I worked in the back bump) but for the rest of the ones I made I did a FDC. Ch 2 turn (60)
Row 2 – 10:  Working in Back Loop Only DC in each stitch across (except in the 1st & last stitch) optional – Ch 2, turn (60)  Finish Off & Add your buttons.

In the video I show you how to add the Buttons if you are having a trouble with that part. I can also post a photo “next year” on another Blog Post.
Other Yarns that I used for these Cowls where #5 Yarn Loops & Thread Charisma. (I’ll show pics on my next post) BUT I only used 1 skein.

For the 1st one I used an L Hook and I did a FDC of 75 and 10 rows.  This ended up being 8 1/2 x 33″.  Then I tried a M/N 9 mm Hook with HDC stitches and started with a Foundation Half Double Crochet and it was 6 1/2″ x 30.
So this is it for now…I’ll update this post with the video when it’s completed!
As always thanks for stopping by and…..

Happy Craftin’,
Yvonne Metz
Vista, CA.
More Twisted Headbands

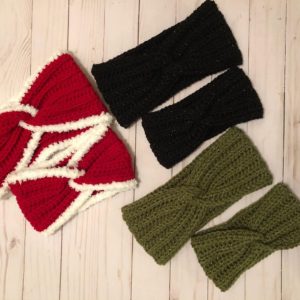
It’s been a busy crafting weekend. To say that I might be a little obsessed with these super EASY Rib-Twisted Headbands is well…YES I might be.

How cute are the Red ones with the white trim? Just in time for Holidays! All I did for that one is after I worked the pattern I took some Bernat Pipsqueak Yarn and added a single crochet row to the top and the bottom, weaved in the yarn tails then went on to the twist part! SO FUN! If you haven’t see these before you can find the video and the pattern in the post before this one or CLICK HERE to get the pattern!

Will share more of what I’ve been working on a little later! Thanks for stopping by.

Happy Crafting,
Yvonne Metz
Vista, CA.

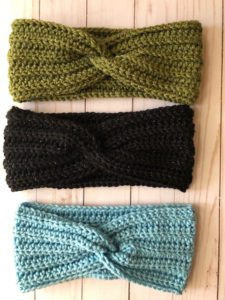
Rib-Twisted Crochet Headband

Happy Friday All! Well I’ve got another great beginner friendly, fun and EASY project! Need a stash buster project? This is the one for you!

These Headbands with a Twist have been going around like crazy in our Crochet FB Group. So fast and easy to make. These directions were shared by a Member in our group, THANK YOU Tracy Gibson!! So super easy to follow.

I’ve also made a video for those that are visual learners. You’ll see it below. Now on to the directions!

Materials:
Yarn:  #4 Worsted Yarn Red Heart w/Love Olive – https://amzn.to/2KEgpIH
Hook:  I 5.5mm – https://amzn.to/300H0JM or
J 6.00 mm – https://amzn.to/35ttRa3
Yarn Needle – https://amzn.to/2O905lw
Measuring Tape

Abbreviations:

CH – Chain
HDC – Half Double Crochet
BLO – Back Loop Only

This Easy and Gorgeous Adult size Headband can be done with ANY Yarn. You are basically going by measurements.  Which means you can make any size you’d like.

Gauge: Really not necessary BUT this is what I got

15 HDC = Approx 4 ¼”
10 Rows = 4 ¼ “

Pattern:
Ch 70 or size you need for your head. This measured about 18 ½” my head measures 21” This will stretch so it was perfect.

Row 1:  working in the bump, HDC in 3rd ch from hook and in each across, ch 1, turn (68)

Row 2:  working in BLO, HDC x 68, ch1, turn (68)

Row 3-10: Repeat Row 2, ch 1 (Mine measured at 4 ¼ at this point. If you’d like it longer then keep going.

Finish Off and leave a tail for sewing.

For the Twist – I followed this Tutorial
How to Sew a Twist on Crocheted Headbands https://www.youtube.com/watch?v=YhuUlJqnDRk&t=74s

That’s all there is to this headband hope you enjoyed – Please do not sell this pattern as your own. It was shared freely. You may sell what you make with it.  The PDF is in our FB Group – https://www.facebook.com/groups/603800456472001/

Enjoy & Happy Headband Makin’ – The Video is Below!  If you have any questions please ask!  Thanks for stopping by!  Yvonne

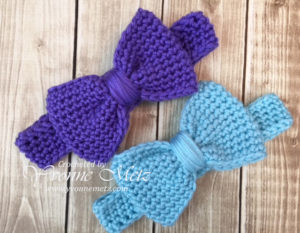
Crocheted Baby Bow Headband

Well looks like everything is back in order!  So here’s my newest video and project! My Daughter is Pregnant with my 2nd Grand-baby and it’s a GIRL! My Co-Worker is also PG and having a Girl. Their Due Dates are a day apart! July 3rd & 4th! So what do I do?  Well Baby Bow Headbands of course!  Many more colors in the making!

Super easy to make and if you’re following my on YouTube then you’ve seen the video. If you aren’t a subscriber yet click on the link in the right hand corner and it’ll take you to my YouTube Channel. I’m also posting the Video below.

I’m thinking you’d like the directions for this? Well I think I can help with that! These are so easy to make you won’t be able to make just one!  Also FYI this project is done by measuring so you can do any size you’d like.

Materials: (affiliate links)

Yarn:  Red Heart Soft Baby Steps #4
Hook:  Clover Amour I 5.5mm hook – http://amzn.to/2pw9cyQ
project is done by measurements so you can use any size hook
Accessories: Scissors, Yarn Needle, Tape Measure (Stitch/Row Counter- optional)

Abbreviations:
Ch:  Chain
Sc:  Single Crochet
FSC: Foundation Single Crochet
Slst:  Slip stitch

Headband

R1:  50 FSC – (or however many you need to get the size you want) Don’t want to do a FSC? You can chain til you get the size you need then go to R2. *Bring both ends together and join w/slst, ch 1
R2-5:  sc in each stitch around, join w/slst, ch 1 (50)  Add more rows if you want it wider.  For the Baby size mine measured 1 ¼”

Finish off after last round and Weave in ends

Bow –  *If you want a Longer Bow add more chains if you want a Wider Bow add more Rows.

Ch 36 – I worked in the back bumps of the chains to give it a nice finish on the bottom.
R1: sc in each back bump of chain across – join to the 1st sc – being careful not to twist. ch 1 (36)
R2 – 12 – sc in each stitch around, join w/sl st, ch 1 (36) Mine measured 2 ¾” this was perfect for Baby Size.

Bring rows of the Bow together – making sure that where you finished off is in the middle – With the yarn threaded run it down the middle of the bow to the bottom and pull tight to scrunch it up. Then Wrap yarn around til it’s as thick as you’d like it. Attach to Bow to the Headband.

You can sell what you make from this pattern just not the pattern itself as it’s FREE! Mentions are awesome and appreciated! Enjoy!

That’s it! As always thanks for stopping by and as always…..
Happy Craftin’,
Yvonne Metz
Vista, CA.
error: Content is protected !!
0
0

Your Cart