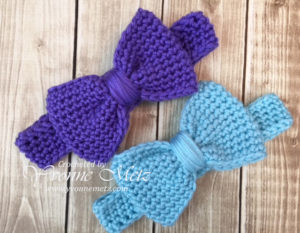
 Well looks like everything is back in order! So here’s my newest video and project! My Daughter is Pregnant with my 2nd Grand-baby and it’s a GIRL! My Co-Worker is also PG and having a Girl. Their Due Dates are a day apart! July 3rd & 4th! So what do I do? Well Baby Bow Headbands of course! Many more colors in the making!
Super easy to make and if you’re following my on YouTube then you’ve seen the video. If you aren’t a subscriber yet click on the link in the right hand corner and it’ll take you to my YouTube Channel. I’m also posting the Video below.
I’m thinking you’d like the directions for this? Well I think I can help with that! These are so easy to make you won’t be able to make just one! Also FYI this project is done by measuring so you can do any size you’d like.
Materials: (affiliate links)
Yarn: Red Heart Soft Baby Steps #4
Hook: Clover Amour I 5.5mm hook – http://amzn.to/2pw9cyQ
project is done by measurements so you can use any size hook
Accessories: Scissors, Yarn Needle, Tape Measure (Stitch/Row Counter- optional)
Abbreviations:
Ch: Chain
Sc: Single Crochet
FSC: Foundation Single Crochet
Slst: Slip stitch
Headband
R1: 50 FSC – (or however many you need to get the size you want) Don’t want to do a FSC? You can chain til you get the size you need then go to R2. *Bring both ends together and join w/slst, ch 1
R2-5: sc in each stitch around, join w/slst, ch 1 (50) Add more rows if you want it wider. For the Baby size mine measured 1 ¼”
Finish off after last round and Weave in ends
Bow – *If you want a Longer Bow add more chains if you want a Wider Bow add more Rows.
Ch 36 – I worked in the back bumps of the chains to give it a nice finish on the bottom.
R1: sc in each back bump of chain across – join to the 1st sc – being careful not to twist. ch 1 (36)
R2 – 12 – sc in each stitch around, join w/sl st, ch 1 (36) Mine measured 2 ¾” this was perfect for Baby Size.
Bring rows of the Bow together – making sure that where you finished off is in the middle – With the yarn threaded run it down the middle of the bow to the bottom and pull tight to scrunch it up. Then Wrap yarn around til it’s as thick as you’d like it. Attach to Bow to the Headband.
You can sell what you make from this pattern just not the pattern itself as it’s FREE! Mentions are awesome and appreciated! Enjoy!
That’s it! As always thanks for stopping by and as always…..
Happy Craftin’,
Yvonne Metz
Vista, CA.