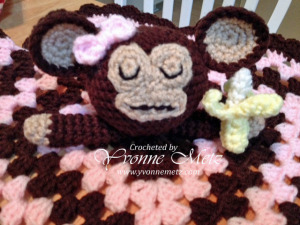
Hi again! Well here we go…let me just say that the blanket itself is a Granny Square! I made my square about 15 x15 which includes the border.
Ok, next I am sharing a link for the Elephant and the a link for the Banana. I can’t post those directions for the banana since it’s from a magazine.
So here are the Links – This one is for the Blankets with all the different ones you can make http://brittasami.blogspot.se/2012/03/baby-blanket.html and the next one is where I found the banana http://www.ravelry.com/patterns/library/sock-monkey-cuddle-blanket If you have any problems with them let me know.
 So now for my directions for the monkey’s facial features: I’ve never written a pattern so I’m going to do the best I can. They are pretty basic and easy I hope! Now you know we all have a different tension and I tend to crochet tight.
I used a size G Crochet Hook for all the features of the Monkey including ears and arms.
For the Head I used a size F hook. This combo worked for me. You’ll just have to play around and see what works for you after you make the Head.
MC = Magic Circle I like this method but you can do whichever method you like best.
SC = Single Crochet
SS = Slip Stitch
Ch = chain
FO = Finish Off
Stitch Markers
We are working in rounds
Eyes: Make 2
MC, ch 1
Rd 1 – 6 sc in MC, ss to 1st sc ch 1 (6sc)
Rd 2 – 2 sc in each sc around ss in 1st sc to join (12 sc) FO Leave a tail of yarn for sewing to the mouth
Mouth –
Rd 1 – Ch 8, sc in 2nd ch from hook in next 5, 2 sc in last stitch – working on the other-side (bottom loops of your chain) sc in next 6 stitches across (14 sc) FO Leave a long tail for sewing to the head.
Inner Ears – Make 2 – MC, ch 1
Rd 1 – 6 sc in MC, ss to 1st sc ch 1 (6sc)
Rd 2 – 2 sc in each sc around ss in 1st sc to join (12 sc)Rd 3- 1 sc in next sc, 2 sc in next st, repeat then join (18sc) FO
Outer Ear – Make 2 – MC, Ch 1
REPEAT Round 1 – 3 from Inner Ear
Rd 4 – sc in each sc around, sl st to 1st (18 sc)
Rd 5 – Holding Inner ear and Outer Ear wrong sides together sc in each around (18 sc) FO Leave a tail of yarn for sewing to the head.
Arms – Make 2 – MC, ch 1 (start w/the lighter color) I also worked in the round so you’ll need a stitch marker
Rd 1 – 6 sc in MC, – (6 sc) Mark the 1st stitch in this round with a stitch marker
Rd 2 – 1 sc in next stitch, 2 sc in next around – (9sc)
Rd 3 – sc in each (9 sc) change colors
Rd 4 – 12 Repeat round 3 – SS to 1st sc leave a long tail of yarn for sewing later. FO
That’s all I did – I sure hope it’s understandable but if you have any questions please feel free post a comment and I’ll get back to you as soon as I can!
Thanks for talking the time to stop by!
Happy Craftin’,
Yvonne Metz
Vista, Ca.
Where are the instructions for the head? I see eyes, inner & outer ear and mouth but nothing for head nor amt of yarn needed.
Hi Nancy – if you click on the link above it will take you to the Ravelry site where the Original Pattern is from. I used that one and just made the facial features for the Monkey. Thank you!
The blog from the link has been removed so the instructions for the head are unavailable. Do you happen to have the instructions for it?
Hi Harley, so sorry for the delay in responding – Not sure my I’m not getting notifications. Let me see what I can do with the instructions. I’m in the process of making some Lovey’s so stay tuned.
Yvonne