Happy Saturday All! Been busy with work and getting videos & pattern ready for week 2 of our Free Doll CAL! I totally spaced and forgot to add the Videos for week 1 so I’ll be posting them here for you! I also created a playlist for Faye on my YouTube Channel!
I’ve had some questions about the Tulip Hook 2.5mm that I’m using for this doll. First time I’ve used this Brand and I have to say I really LOVE it! I only bought the one hook but may just have to buy the set. Hmmmm……isn’t Mother’s Day tomorrow? Anyway…I love my Clover Amour but am also a huge fan of the Tulip Brand also. Can one have to many hooks? Besides they are super comfy and I know I crochet longer before having to put down to give my fingers a rest. In the video I also share about the bent tip needles I used and have to say they are great for not just Doll Making but any project!
***Edited to Add the Pattern for Week 2 which is the Faye Dress & Shoes CAL sorry about that!
Well that’s all I have right now if you are interested in joining our Facebook Group click the link – Amigurumi Dolls Worldwide **You’ll be asked 3 questions before you join, this is just to cut down on spammers!
Have a great day and Happy Craftin’,
Yvonne Metz
Vista, CA.
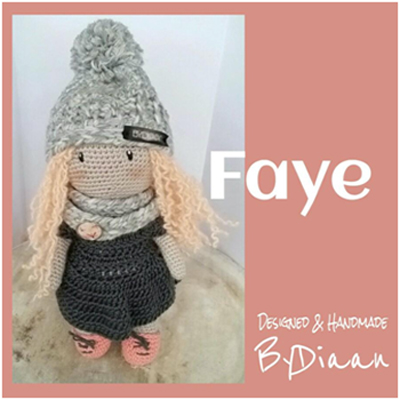
Meet Faye – she was Designed by Friend Diana of the Netherlands! She will be our next Free CAL – I LOVED making her! She will be a 3 week CAL starting this Friday May 4th – sorry meant to post sooner!
If you are interested in this CAL head over to our FB Group and get all the details. I’ll also be making the Videos for these as well. If you’ve been wanting to start making dolls this is a great one to make! She’s super adorable! She’ll put a smile on anyone’s face!
Drop back by on Friday and I’ll share the Doll I made! I’m pretty happy with her! If you follow me on Instagram you’ll see mine there!
We’ve added all the supplies you’ll need to make her there also! If you have any questions please don’t hesitate to ask!
Thanks for stopping by and until next time…..
Happy Craftin’,
Yvonne Metz
Well looks like everything is back in order! So here’s my newest video and project! My Daughter is Pregnant with my 2nd Grand-baby and it’s a GIRL! My Co-Worker is also PG and having a Girl. Their Due Dates are a day apart! July 3rd & 4th! So what do I do? Well Baby Bow Headbands of course! Many more colors in the making!
Super easy to make and if you’re following my on YouTube then you’ve seen the video. If you aren’t a subscriber yet click on the link in the right hand corner and it’ll take you to my YouTube Channel. I’m also posting the Video below.
I’m thinking you’d like the directions for this? Well I think I can help with that! These are so easy to make you won’t be able to make just one! Also FYI this project is done by measuring so you can do any size you’d like.
Materials: (affiliate links)
Yarn: Red Heart Soft Baby Steps #4
Hook: Clover Amour I 5.5mm hook – http://amzn.to/2pw9cyQ
project is done by measurements so you can use any size hook
Accessories: Scissors, Yarn Needle, Tape Measure (Stitch/Row Counter- optional)
Abbreviations:
Ch: Chain
Sc: Single Crochet
FSC: Foundation Single Crochet
Slst: Slip stitch
Headband
R1: 50 FSC – (or however many you need to get the size you want) Don’t want to do a FSC? You can chain til you get the size you need then go to R2. *Bring both ends together and join w/slst, ch 1
R2-5: sc in each stitch around, join w/slst, ch 1 (50) Add more rows if you want it wider. For the Baby size mine measured 1 ¼”
Finish off after last round and Weave in ends
Bow – *If you want a Longer Bow add more chains if you want a Wider Bow add more Rows.
Ch 36 – I worked in the back bumps of the chains to give it a nice finish on the bottom.
R1: sc in each back bump of chain across – join to the 1st sc – being careful not to twist. ch 1 (36)
R2 – 12 – sc in each stitch around, join w/sl st, ch 1 (36) Mine measured 2 ¾” this was perfect for Baby Size.
Bring rows of the Bow together – making sure that where you finished off is in the middle – With the yarn threaded run it down the middle of the bow to the bottom and pull tight to scrunch it up. Then Wrap yarn around til it’s as thick as you’d like it. Attach to Bow to the Headband.
You can sell what you make from this pattern just not the pattern itself as it’s FREE! Mentions are awesome and appreciated! Enjoy!
That’s it! As always thanks for stopping by and as always…..
Happy Craftin’,
Yvonne Metz
Vista, CA.
Wow….I had no idea how much work these CAL were! But I have to say so much FUN!!! I’m super happy with how mine turned out! Love the variegated yarn that I used for this one! I see more Mermaids coming.
Here’s the 3rd and Final Video for this Mermaid Crochet a Long! Make sure watch til the end as you’ll see the Sneak Peek of the next Doll Crochet a Long. So CUTE! Please don’t hesitate to ask any questions! Again if you’d like to share and aren’t in our FB Group message me and I’d love to see it and share here on my Blog!
As always thanks for stopping by and Happy Craftin’,
Well here it is Sunday March 3rd, 2018 where did February go? WOW there was alot going on for me last month that’s for sure. Things are finally slowing down and so I’ve got a few things that have been going on that I’d like to share with you all! 1st my friend Diana and I have created another Facebook Group – I’m super excited to announce our New Group called “Amigurumi Dolls Worldwide” I’ve been wanting to do a Doll Group for awhile now and I thought it was only fair to drag her along with me since she dragged me to the Crochet Messy Bun Group! LOL!
Anyway – in this Group we’ll be sharing FREE Doll Patterns, Tips on Doll Making and we’ll be doing a few “Crochet Doll A Longs” (CDAL) I’m super excited about this! If you’ve been wanting to learn Doll Making OR are a Doll Maker and enjoy making them, then come an join our Group! Our 1st CDAL will be on March 15th – I’ll be making the videos also for those that are visual learners.
Here is what we’ll be making first! YES….the Mermaid Doll – she is my own pattern and I am absolutely in LOVE with her! So click on the link above to join in.
If you don’t have Facebook and would like to do the CDAL also come back on March 15th that’s when the pattern will be posted as that’s when it starts!
Thanks for stopping by and Happy Crafting!
Yvonne Metz
So the Basic Granny Square pattern has been around forever! I would say it’s a Classic! I just LOVE how versatile it is! It’s perfect for beginners too! You can make so many cute things with it. I learned along time ago how to make it. I was also in several what they called “Friendship” Square swaps. It’s where you would make a certain amount of squares and send them out to the person Organizing the swap and in return you would get Squares from others. The Friendship Square blanket. I’ve got about 3 of them. One was a Christmas Theme, Spring and Any Occasion theme. They were fun to make. Once you got them all you’d crochet them all together to make your Blanket. You could also make Baby “Lovey’s”, you could just keep going and make one Big Giant Square til it’s as big as you want it to be. Change colors etc….ideas are endless!
Well my first video of the year is “The Basic Granny Square”. At the middle school I work at we have a Crochet Club and at the end of last year I had promised them a video and I finally got around to making it. So I’ll share it here also. I’ve got many more projects that are in the making so stay tuned. Below the video I’ve got the Basic Instructions for The Granny Square.
As always thanks for stopping by and…
Happy Craftin’,
Yvonne Metz
NOTE: Ch 3 counts as your 1st DC unless otherwise noted
Instructions:
There are a few ways to start – here are my 2 favorite
Do a Magic Circle/Ring
Start with a Slip Knot, ch 4 and join to make a circle
Either one is fine to do, your choice
Round 1: Ch 3, 2 DC into the ring ch 2, (*3 DC into the ring, ch 2) Repeat (*) 2 more times, join with a slst to the top of your beginning ch3, slst til you get to the ch 2 space.
*I call these 3 DC – Clusters*
Round 2: Ch 3, 2 DC into the ch 2 space, ch 2, 3 DC into the same space, ch 1, (*3 DC into the next, ch 2 space, 3 DC into the same space, ch 1) Repeat (*) 2 more times, join with a slst to the top of your beginning ch3, slst til you get to the ch 2 space.
*We just made our 4 Corners
Round 3: Ch 3, 2 DC into the ch 2 space, ch 2, 3 DC into the same space, ch 1, 3 DC into the ch 1 space, ch 1 (*3 DC into the next, ch 2 space, 3 DC into the same space, ch 1, 3 DC into the ch 1 space, ch 1) Repeat (*) 2 more times, join with a slst to the top of your beginning ch3, slst til you get to the ch 2 space.
*We are now growing our Square
Round 4: Round 3: Ch 3, 2 DC into the ch 2 space, ch 2, 3 DC into the same space, ch 1, 3 DC into the ch 1 space, ch 1, 3 DC into the ch 1 space, ch 1 (*3 DC into the next, ch 2 space, 3 DC into the same space, ch 1, 3 DC into the ch 1 space, ch 1, 3 DC into the ch 1 space, ch 1 ) Repeat (*) 2 more times, join with a slst to the top of your beginning ch3, slst til you get to the ch 2 space.
Repeat the process til you get the desired size you want.
Hey All! I wanted to share a question that I get asked a lot. “What Crochet Hooks do I use?” Well I use many of them Boye Brand was what I started out with many years ago along with Susan Bates. But I have found a New Brand “Clover”. I was looking for something with a little more comfort as I do crochet A LOT! I tried Clover Soft Touch it was comfy BUT I fell in LOVE with Clover “Amour” – These are my all time FAVORITE Hooks! If you watch my videos I use them ALL the time! I love the soft grip and I do crochet much longer with them. I have one more set to collect but I’ve got just about ALL of them! Below I’m adding the ones that I do have (Amazon Affiliate)
If you are looking for something new and crochet a lot TRY them – I tried the “J” Hook first then ordered my set! You won’t be disappointed! I’ve got more goodies to share with you all a little later as things have slowed down here. I plan on Blogging more and doing more videos in 2018!
As always thanks for stopping by and Happy Crafting!
Yvonne Metz
I did modify it to fit a Teen/Adult hat. Here is what I did –
With the L Hook I started with a chain of 44 and that measured 20″ –
I switched to M Hook when it changes to Red. After round 3. Then after 4th round it says to Repeat it 4 more times – I ended up doing 8 more times for Adult size. Giving me a total of 12 rows –
Then when we get to the Shape top: This is what I did (You’ll see in the pattern is says next rnd: I changed it up)
R1 – ch1 *(Sc2tog), sc in next 20, repeat* once, join, ch 1 (42)
R2-3 – sc in each around, join, ch 1 – (42)
R4 – (sc in next 5, sc2tog), repeat () around, join, ch1 (36)
R5-6 – sc in each around, join, ch 1 – (36)
R7 – (sc in next 4, sc2tog), repeat () around, join, ch1 (30)
R8-9 – sc in each around, join, ch 1 – (30)
R10 – (sc in next 4, sc2tog), repeat () around, join, ch1 (25)
R11-12 – sc in each around, join, ch 1 – (25)
R13 – (sc in next 4, sc2tog), repeat () around, join, ch1 (20)
R14-15 – sc in each around, join, ch 1 – (20)
R16 – (sc in next 4, sc2tog), repeat () around, join, ch1 (16)
R17-18 – sc in each around, join, ch 1 – (16)
R19 – (sc in next 4, sc2tog), repeat () around, join, ch1 (12)
R20-21 – sc in each around, join, ch 1 – (12)
R22 – (sc in next 4, sc2tog), repeat () around, join, ch1 (10)
R 23-32 – sc in each around (10) From here you’ll follow the pattern Even though you’ll have 20 stitches instead of 16. It will still work out fine!
Should you have any questions please let me know – If you are not a crocheter and would like to order a Santa Hat click on the Etsy link in the top right hand corner. OR message me and I can send you a Paypal Invoice.
Seriously, not sure what’s gotten into me. I’m no Designer but these just keep coming! Totally inspired by ALL the AWESOME talent out there! So here is my latest “Just Chillin'” Beanie! It’s so laid back and it’s got that slight Slouch to it and of course a POM POM! I’ve got a video in the works and will post it as soon as it’s loaded.
But for now here is the Free PDF pattern – Just Chillin Slouchy
As I said I’m not a Designer by any means and this was made to fit a Teen/Adult I’m sure you can do any size just by measuring the length of the band. I’ll try and experiment with different sizes later OR if you have any ideas leave me a comment! Questions about the pattern let me know this too!
Well Grandson is here so I’m off! Thanks for stopping by and as always…..
So as promised here is my new Messy Bun Hat Design! So this is very rare that I create a Design I normally test patterns for others! LOL! But here they are straight from my brain and inspired by so many hats I’ve seen! Super warm and cozy.
I’m calling this The “BoHo Messy Bun Beanie”. Which was inspired by a member of a FB Group I’m in. I originally thought “Bohemian” but was like hmmm. I thought BoHo then as I saw a comment on my post suggesting the same name! Great minds think alike right? Anyway I’m working on a video for this hat. Hopefully this week! It’s super easy and FUN to make!
This one I used Red Heart with Love yarn #4 worsted in color Mango! Doesn’t it just POP! You can’t tell from the photo but it’s super squishy! I’m just in love with this look. It’s got that casual but also Elegant look about it. I’m thinking I see a matching scarf to go with maybe? Oh yes I see it and Infinity style? Hmmmmm…..sounds like another Design pattern in the making!
If you are interested in purchasing a Beanie these will be in my Etsy soon. If you are a fellow crocheter you can download your copy here! BoHo Messy Bun Beanie If you have any questions about the pattern or you find mistakes please let me know. Once you get the hang of it they are pretty fast to make. As mentioned above I’ll be doing a video soon so if you want to see the video (some of us are visual – I LOVE videos) then subscribe to me on YouTube so you know when I load the video. The link is up above on the right.
Lastly, here is a Messy Bun version which is in the pattern. I mean you can’t make a hat now a days without it being a Messy Bun too right? This one uses Red Heart Essentials yarn!
Stay tuned for the next one I’m going to share it’s another one that was in my brain. I will be sharing this a little later today so come back and check it out!
Thanks for stopping by & as always…
Happy Craftin’,
Yvonne Metz